Monday, May 26, 2014
Diaper Baby Cake
The start of my diaper cake for a baby shower for a little boy. You take pampers......I used size 2 diapers in a box of 94 because the baby grows so fast. These will be nice and if the Mom to Be wants to let the cake sit for a while she can. So, you fan out the diapers inside a cake pan.(Some say this is the preferred method because it less work for the new Mom. No unrolling of rolled up diapers). This is why I chose to go this route. I also think it looks pretty; the fanned diapers are like frosting to me. Pack them tightly and get them to look the way you want paying particular attention the sides and the spacing and then the top to keep it flat. When they are just how you want them, put a heavy duty rubber band around them. You don't have to worry about it showing, because you will decorate with ribbon, or fabric which will cover the bands. You can sneak fun items into the center if you wish. Some people hide a wine bottle for the parents in the layers. Some add other baby items, lotions, soap etc. You eventually take the diapers out of the pan and stack onto a nice board. Then the decorating begins. Use fun colors and make a theme of choice. I will show more of what I am decorating at a later time. Usually a stuffed animal goes on top........but feel free to be creative. This is a creative project and will be appreciated for your own personal flare! :) Let the fun begin!!!!!
Monday, May 12, 2014
Gnocchi First attempt
My sweet friend Marilyn gave me a recipe for Gnocchi. I have never made it before and I was inspired to give it a try.
I ordered a little gnocchi board. You make the dough and roll it across the board and it makes some sweet little lines. Very pretty! I made a recipe of:
2 potatoes, cooked and grated.
2 cups of flour
2 eggs
a pinch of salt and pepper too
You roll the dough and cut into small pieces. Roll it over the board and throw into boiling water. They cook very quickly, 2-3 minutes.
I was pleased as they were tender and delish!! I read that if you make them poorly, they are tough like little bullets! :(
The rest of the recipe has onions, fresh spinach, garlic, seasoned tomatoes and chicken broth, pepper too. Oh and white beans. I did put them in, but after I took out my portion, as I don't like beans of any sort---except green beans! :) This recipe was DELCIOUS!!!!!! Earl and I really enjoyed and I will share with Dad tomorrow. YUM! Thanks Marilyn!
I ordered a little gnocchi board. You make the dough and roll it across the board and it makes some sweet little lines. Very pretty! I made a recipe of:
2 potatoes, cooked and grated.
2 cups of flour
2 eggs
a pinch of salt and pepper too
You roll the dough and cut into small pieces. Roll it over the board and throw into boiling water. They cook very quickly, 2-3 minutes.
I was pleased as they were tender and delish!! I read that if you make them poorly, they are tough like little bullets! :(
The rest of the recipe has onions, fresh spinach, garlic, seasoned tomatoes and chicken broth, pepper too. Oh and white beans. I did put them in, but after I took out my portion, as I don't like beans of any sort---except green beans! :) This recipe was DELCIOUS!!!!!! Earl and I really enjoyed and I will share with Dad tomorrow. YUM! Thanks Marilyn!
Monday, April 07, 2014
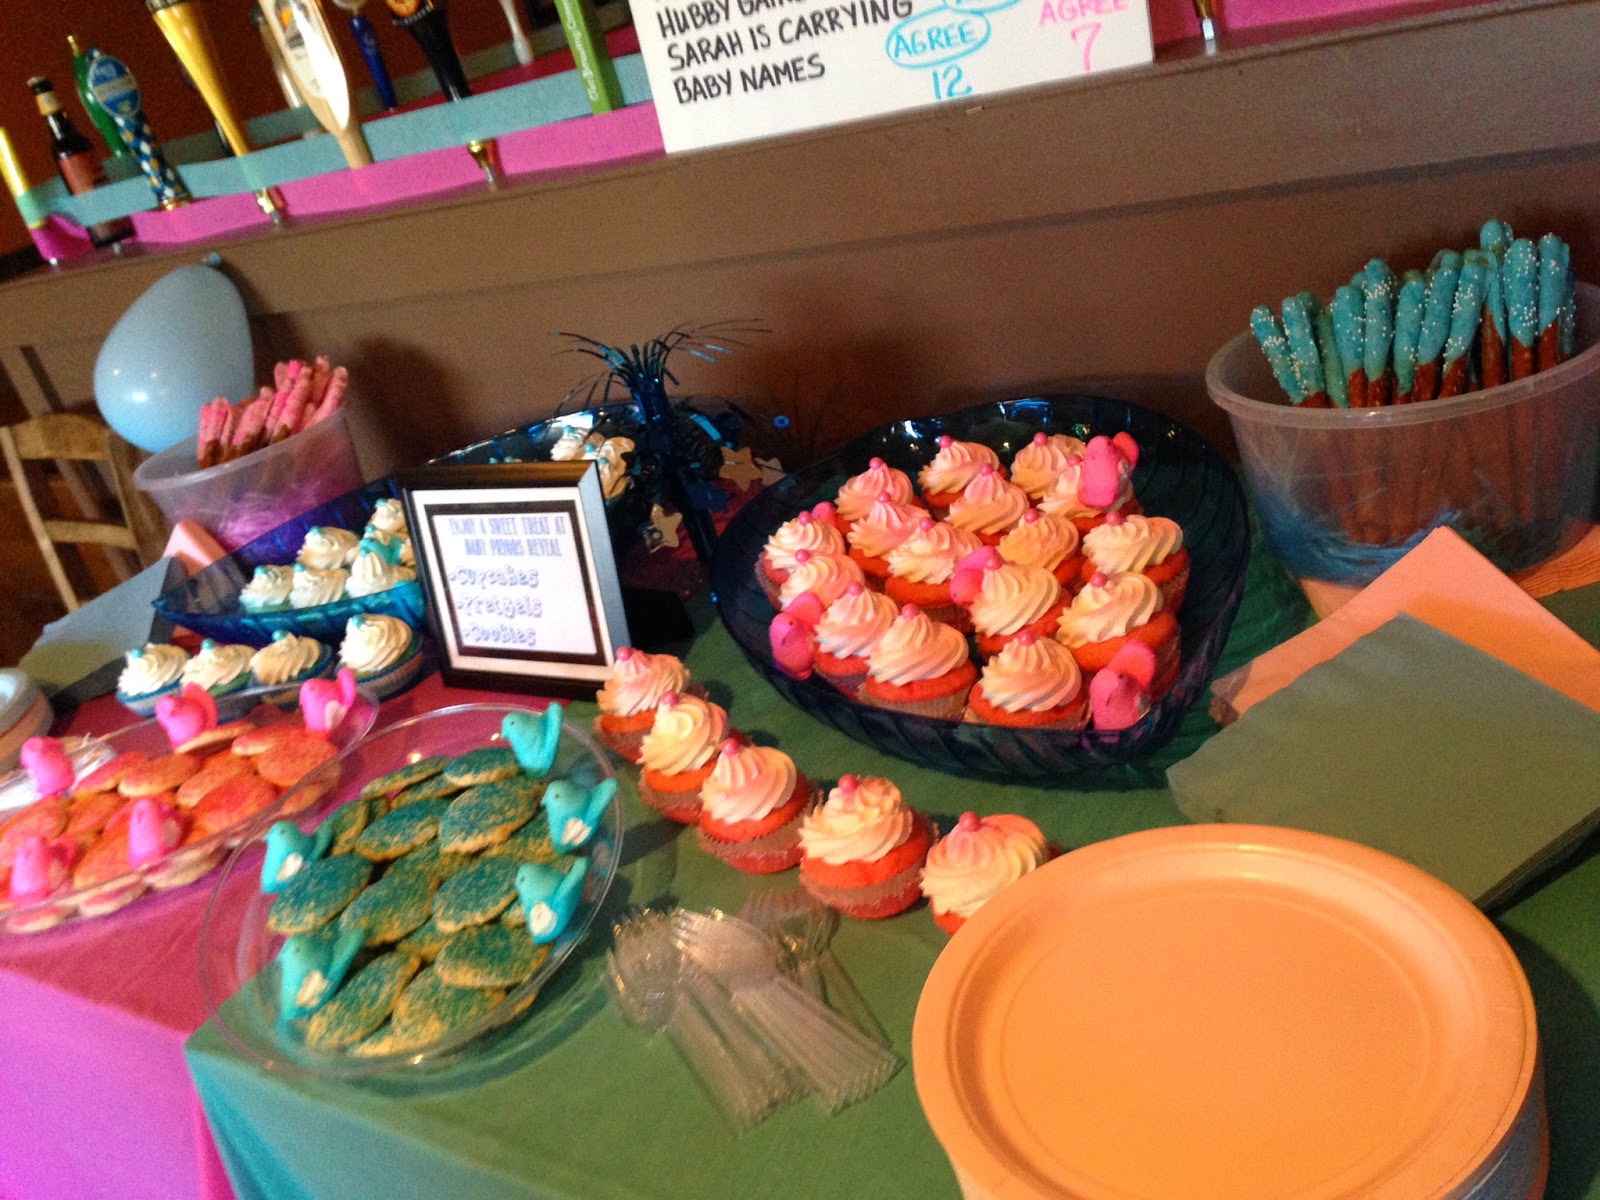
The party for baby Pryor came out so wonderfully!!!!!! Sarah and Ben were thrilled with the reveal that the baby is a BOY!!!!!!!!!!!!! The food was delish, Amber and Jules did a great job with everything and it was super fun. The poster with the fingerprints came out sooooooooo nicely and now they have everyone's prediction and a little something to keep for a memory! They are a darling and sweet couple and now know they will have a precious BOY BUNDLE of LOVE coming!!!!! Exciting!
Wednesday, March 19, 2014
Baby reveal board
I am helping my daughter with a baby reveal party she is throwing for a friend. I saw this adorable idea and wanted to give it a spin of my own. I used a white cork board and cut the tree and stork/baby silhouette from black poster board. Then I added the beautiful saying at the top from wall sticker. I included the date and Baby's last name The guests that attend will have a pink and blue stamp pad to dip their finger into. They will put their guess, pink for a girl and blue for a boy, with their fingerprint on the board near the tree. The fingerprints will become the LEAVES! The Baby's Mom and Dad will have this to take home as a memory piece and also to tease the guests in the future about their guess! :) I will share the board again after the fingerprints are added.
The board before the extras were added on.
Saturday, March 15, 2014
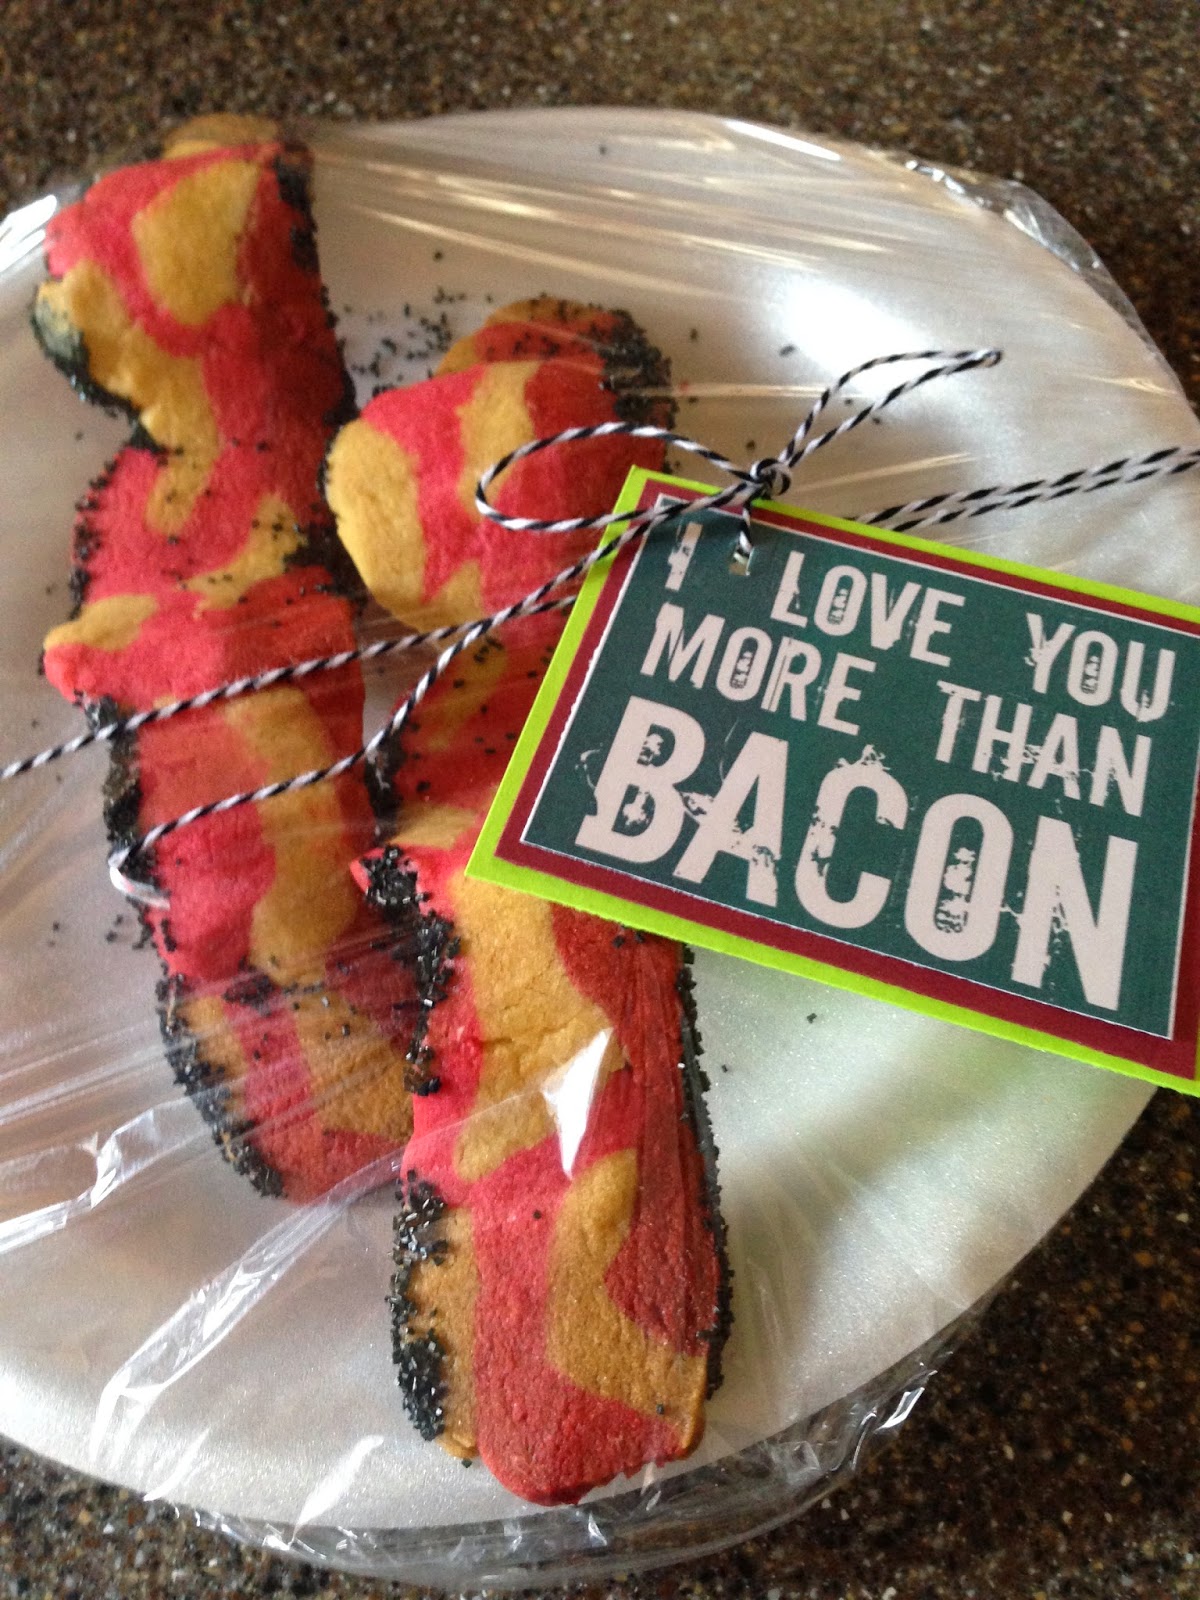
Bacon look alike Sugar Cookies!
Here we go! Looking at these three balls of dough you would never think BACON, would ya? A sweet birthday treat for a wonderful friend of Amber's! You make a sugar cookie (cut out dough).
Then you color the three balls. One light yellow/brown, the next, pinkish red like hamburger, and the final one a dark deep red/brown. *Note to self. Next round, the yellow ball should be the biggest, the pinkish red the smallest and the deep red the second biggest.
The deep red goes on the bottom. Make hills and valleys in the dough. Then add the other dough in between pushing down and end with mainly yellow. Do odd forms, as bacon is odd. We had a bit too much pink.
Then cover and refrigerate for 30 minutes.
Prep some dowels to fit your baking sheet as they will make the curves in your bacon. :) Parchment paper must be used to help them not to stick.
Then we cut off the rough edge and begin slicing the bacon strips. *Note to self, next time a bit thinner slicers. Also, the dough has to warm up a bit to get them to drape over the dowels. If they crack, use your warm fingers to press them together well. The dough needs to be cold to cut, but left to warm a touch to form to the dowels.
Baking time is almost doubled,but watch them carefully. My normal baking would have been 14 minutes, but these needed nearly 30.
Let cool completely before removing from the sheet. Pull gently to get the release and then make a mixture of meringue powder and a teeny bit of water, and paint the edges and sprinkle with black sugar. This is the final detail to make them feel more like bacon! :)
They came out so fun!!! I love the idea and no frosting involved!
Make a catchy tag to show the person you are giving them to that you love them! :) They won't believe they are cookies!
Try this with your favorite sugar cookie recipe. Or use mine.
Sugar cookie recipe:
Then you color the three balls. One light yellow/brown, the next, pinkish red like hamburger, and the final one a dark deep red/brown. *Note to self. Next round, the yellow ball should be the biggest, the pinkish red the smallest and the deep red the second biggest.
The deep red goes on the bottom. Make hills and valleys in the dough. Then add the other dough in between pushing down and end with mainly yellow. Do odd forms, as bacon is odd. We had a bit too much pink.
Then cover and refrigerate for 30 minutes.
Prep some dowels to fit your baking sheet as they will make the curves in your bacon. :) Parchment paper must be used to help them not to stick.
Then we cut off the rough edge and begin slicing the bacon strips. *Note to self, next time a bit thinner slicers. Also, the dough has to warm up a bit to get them to drape over the dowels. If they crack, use your warm fingers to press them together well. The dough needs to be cold to cut, but left to warm a touch to form to the dowels.
Baking time is almost doubled,but watch them carefully. My normal baking would have been 14 minutes, but these needed nearly 30.
Let cool completely before removing from the sheet. Pull gently to get the release and then make a mixture of meringue powder and a teeny bit of water, and paint the edges and sprinkle with black sugar. This is the final detail to make them feel more like bacon! :)
They came out so fun!!! I love the idea and no frosting involved!
Make a catchy tag to show the person you are giving them to that you love them! :) They won't believe they are cookies!
Try this with your favorite sugar cookie recipe. Or use mine.
Sugar cookie recipe:
Ingredients
- 1 cup unsalted butter, room temperature
- 1¼ cup sugar
- 1 egg
- 1½ teaspoons vanilla extract
- ½ teaspoon almond extract
- 3 cups of flour
- 1½ teaspoons baking powder
- ¼ teaspoon salt
Instructions
- Cream together butter and sugar until light and fluffy. Add in egg, vanilla extract, and almond extract and mix well combined.
- Combine flour, baking powder, and salt in a separate bowl. Slowly add the flour mixture to the butter mixture and mix until completely combined.
- Roll three balls and add the food colors. Make your bacon designed patty and then Chill 30 minutes.
- Cut dough into bacon strips and transfer to a baking sheet when warm enough to mold over the dowels. Be sure to pinch together the dough if it looks to be breaking over the dowels. Bake at 350 degrees for nearly 25-30 minutes watching carefully.
- Paint with a mixture of meringue powder and a smidge of water onto the edges and sprinkle with black sugar. Viola, perfectly fun bacon cookies that will impress and cause a giggle for the receiver for sure!
Friday, December 27, 2013
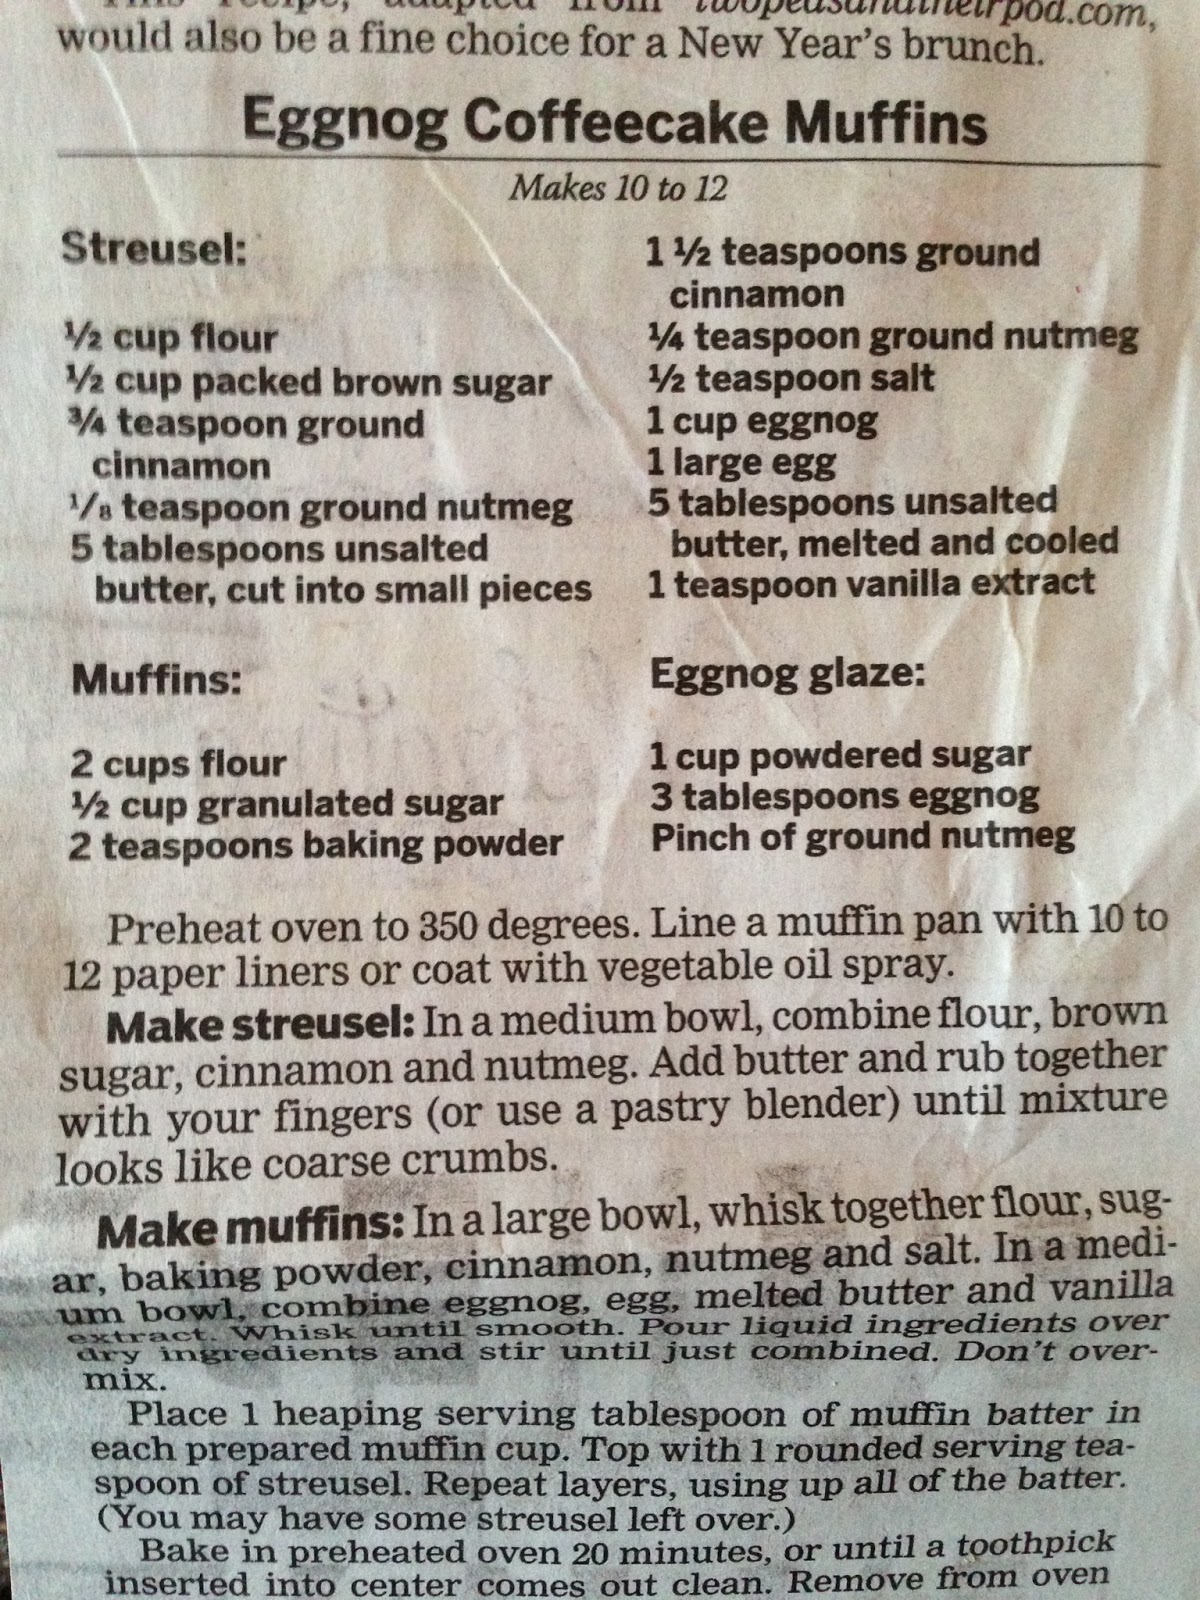
Eggnog Coffeecake Muffins
Here is my attempt at these muffins!
The muffin recipe was out of the Journal for things do outside the box with eggnog! :)
Here is the recipe. I thought they came out nicely! Earl said they taste great, he loves eggnog. I am hoping your Christmas was joyous and spent with loved ones! Happy New Year too!
The muffin recipe was out of the Journal for things do outside the box with eggnog! :)
Here is the recipe. I thought they came out nicely! Earl said they taste great, he loves eggnog. I am hoping your Christmas was joyous and spent with loved ones! Happy New Year too!
Monday, December 16, 2013
Are you as blessed as I am with sweet, giving, thoughtful, talented friends? I hope so!
I wanted to share with you the most ADORABLE and daintily wonderful hand sewn felt ornaments that I got as a gift from my friend Debbie.
And look at her sweet packaging! The thought, effort and love that is put into these little dreams is just delightful!
She made me the little doe last year! I LOVE it and keep it out year long! I think Debbie could do a book on these, how to create these little wonders for your tree.
This year she gave me TWO, the blushed cheek elephant and this Scottie dog! Do you have a favorite?
This is my own personal collection of hand sewn ornaments from Debbie!!!!! I am beyond thrilled!!!! I think I need to get her to teach me.......though, I know I would not be so good at these tiny stitches!!! THANK YOU Debbie! xoxoxoxoxoxxo
I wanted to share with you the most ADORABLE and daintily wonderful hand sewn felt ornaments that I got as a gift from my friend Debbie.
And look at her sweet packaging! The thought, effort and love that is put into these little dreams is just delightful!
She made me the little doe last year! I LOVE it and keep it out year long! I think Debbie could do a book on these, how to create these little wonders for your tree.
This year she gave me TWO, the blushed cheek elephant and this Scottie dog! Do you have a favorite?
This is my own personal collection of hand sewn ornaments from Debbie!!!!! I am beyond thrilled!!!! I think I need to get her to teach me.......though, I know I would not be so good at these tiny stitches!!! THANK YOU Debbie! xoxoxoxoxoxxo
Subscribe to:
Posts (Atom)